Line Command In AutoCAD
Line Command In AutoCAD
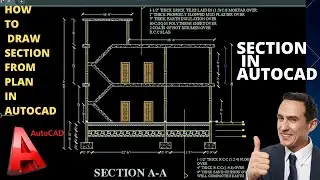
In this video tutorial i have explained the line command in detail. and I have also explained how to use line command to draw any geometrical shape. In this video tutorial we learn about autocad basic and most important command line. This tutorial is made with AutoCAD 2022-2023 but you can use it for any version of AutoCAD. This tutorial is all about the draw command in AutoCAD. So in this video we learn about autocad basic and most important command line (all Options to draw line in different conditions).
Thanks!
-----------------------------------------------------------------------------------------------------------------------
AutoCAD Complete Course For Beginners 2D+3D
PART-1 ( • AutoCAD Course Part-1 )
PART-2 ( • AutoCAD Course Part-2 )
PART-3 ( • AutoCAD Course Part-3 )
PART-4 ( • AutoCAD Course Part-4 )
PART-5 ( • AutoCAD Course Part-5 ) 3D
PART-6 ( • AutoCAD Course Part-6 ) 3D
PART-7 ( • AutoCAD Course Part-7 ) 3D
PART-8 ( • AutoCAD Course Part-8 ) 3D
PART-9 ( • AutoCAD Course Part-9 ) 3D
-----------------------------------------------------------------------------------------------------------------------
Detaile About This Command:
The line in AutoCAD is drawn by specifying the starting and ending point through the cursor.
The steps to create a line are listed below:
Open the AutoCAD software.
Select the Line icon from the ribbon panel or type L or Line and press Enter on the command line.
Specify the starting point and endpoint using the cursor on the workspace or drawing area.
Line Command
We can also continue the line segments by specifying the endpoints.
Press Enter or Esc to exit.
Line using Coordinates
The steps to create a line by specifying the coordinates are given below:
Open the AutoCAD software.
Select the Line icon from the ribbon panel or type L or Line and press Enter on the command line.
Type the coordinate value for the first point in the form of X-coordinate, Y-coordinate.
For example, 3, 4
The value of the x-axis and y-axis will be determined with respect to the UCS icon. So we can place the UCS according to the requirements.
Now, type the coordinate value for the second point or endpoint. For example, 10, 6.
Line Command
We can continue the line segment by specifying other points.
Press Enter or Esc or Spacebar to exit.
Line using Angle
The steps to create a line with a specific angle are given below:
Open the AutoCAD software.
Select the Line icon from the ribbon panel or type L or Line and press Enter on the command line.
Specify the first point. We can specify it by using the coordinates or by randomly using the cursor. For example, 4, 5.
Enter the polar coordinates in the form of length, and angle. For example, 7,55. Here, 7 is the length of a line, and 55 is the angle.
The angle will be drawn w.r.t the previous point.
Press Enter or Esc or Spacebar to exit.
Line Command
We can continue the line segment by specifying other coordinates.
Press Enter or Esc or Spacebar to exit.
The steps to create a line using the relative coordinates are listed below:
Open the AutoCAD software.
Select the Line icon from the ribbon panel or type L or Line and press Enter on the command line.
Specify the first point. We can specify it by using the coordinates or by randomly using the cursor. For example, 4,3.
Specify the endpoint as the relative coordinate. For example, 3, 3.
Line Command
We can continue the line segment by specifying other coordinates.
Press Enter or Esc or Spacebar to exit.
-----------------------------------------------------------------------------------------------------------------------
****************************************************************************
Other Social links
YouTube- https://www.youtube.com/@walitechnics...
Face Book- https://www.facebook.com/profile.php?...
Instagram- / abdul07062
Twitter- / abdulwa44874132
-----------------------------------------------------------------------------------------------------------------------
#LineCommandAutoCAD #AutocadTutorial #AutoCAD2D #Autocad