Use OpenVPN Access Server with Local Database and Google Authenticator- V 2.7.5
Learn more about Access Server: https://openvpn.net/access-server/?ut...
Hello from OpenVPN. This tutorial will focus on using OpenVPN Access Server with local database authentication and Google Authenticator for two-factor auth.
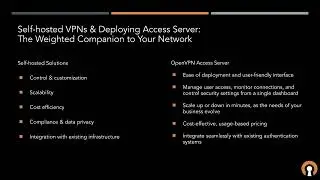
Access Server has four types of authentication available.
General, which is our local option. PAM, RADIUS and LDAP. I'll click on general here and you'll see that local is in fact enabled. Now local refers to a sequel light 3 database that is launched with the Access Server package.
So you can go ahead and start creating users immediately and they can connect. Now on the same page further down is the setting for Google Authenticator.
The default option when Access Server is launched is yes using NAT. We also have a routing option, if routing is chosen then NAT obviously will not be used, so a couple of static routes are required. And keep in mind that these are global settings if they are set here every connected user will have access to this network and to any resources that are specified here. If you have needs that require different users to have access to different resources you'd want to configure that. Further down at the group or the user level.
There's three levels of access control and Access Server and that is the global level which we're looking at, the group level, and then the user level. Right below that text box is the Split Tunneling option. This is how Split Tunneling is configured or turned off. So should Klein Internet traffic be routed through the VPN.
The setting below that is by default turned on and that should clients be allowed to access network services on the VPN gateway IP address and this will allow clients to ping the VPN gateway IP whether Split Tunneling is on or not. Let's take a look at the client web service settings options. Again in the configuration menu menu CWS settings. And I've been logged out. Let me log back in real quick.
CWS settings — so here's where you can customize the Client Web Service, so you can turn these off and or on to show or hide the different types of clients that are available. With all of them enabled your users, your connected users that go to the client web service will receive an option to download the version 3 for Mac and Windows and the version 2, along with the mobile clients.
The different types of profiles available are server locked profile, user locked, and auto login profile. Server logged profiles are for connecting to the Access Server. They are not locked to any particular user instead they're locked to the server, the user will always need to enter their username and password in order to connect because it doesn't have any of that information. These can be useful if the admin wants a general profile that can be sent to multiple different users to be used on different devices.
The user log profile is a profile that is generated specifically for the logged in user and the certificate username and password will all be unique to that user. And then our auto login profile, these profiles are certificate authentication only they bypass the basic authentication which is very useful for use with devices that need to be connected to the Access Server that that act as a VPN gateway for instance.
Now if I go to user permissions. Here. Instead of click on it you see I have a test user set up. Let's go ahead and set up a new one named 'test user' and under more settings is where we can set the password. And then a very handy option -- are these radio buttons that will allow the user to change the password on their own so that you can give them basically a one time password and then that user when they logging can change it.
Also is the IP addressing section, remember I spoke about the static option. This is where you can specify a static IP and then access control. If you did not want to use the global VPN settings then you could set a subnet within within this text box and then that user would have access to that subnet from here. Okay I have. I'm just going to get rid of that and go ahead and save this new user. Update the running server, that user is in the database now and I should be able to log in to the Client Web Service with that information.
There we go. Remember Google Authenticator is enabled. Luckily it's a very easy process. All we have to do is open the Google Authenticator app on a mobile device. Scan this QR code. Which I am doing right now. And you will get a one time password generated. And I'll just enter that.
Confirm the code. And there we go I'm logged in as connected as a user and you see I only have the option of a user locked profile which I did not select server locked profile.