HOW TO USE ADJUSTMENT LAYER IN ADOBE PREMIERE PRO 2020
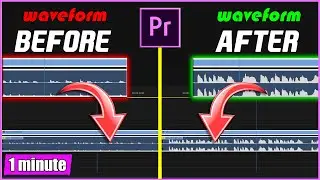
HOW TO USE ADJUSTMENT LAYER IN ADOBE PREMIERE PRO 2020 // If you want to color correct multiple clips at the same time or just apply some video effects without having to save changes to the actual clip then you can use ADJUSTMENT LAYER.
ADJUSTMENT LAYER is really easy to use and gives you a lot of options.
To add an ADJUSTMENT LAYER to your project, you need to hover your mouse to Media Browser Panel (usually located in the bottom left corner), then click on the Paper Sheet icon and Choose Adjustment Layer. By default adjustment layer is created with the same video properties as your Sequence Settings. After an adjustment layer has been added to your media folder, you can drag it onto your timeline, highlight it, and apply all the effects to the adjustment layer instead of the clips.
It is very simple, yet genius. Now you can use Adjustment Layer and make your videos more professional!
Check out more Adobe Premiere Tutorial videos here: • ADOBE PREMIERE PRO
4 Ways to Adjust Track height in Adobe Premiere 2020: • 4 WAYS TO CHANGE TRACK HEIGHT IN ADOB...
How to Remove ECHO during Voice-Over recording in Adobe Premiere 2020: • HOW TO REMOVE ECHO DURING VOICE-OVER ...
How to make Circle Crop in Adobe Premiere Pro: • 2 EASY WAYS TO MAKE CIRCLE CROP IN AD...
How to synchronize multiple Audio tracks in Adobe Premiere Pro 2020: • HOW TO SYNCHRONIZE AUDIO IN ADOBE PRE...
Music by: Syn Cole - Feel Good [NCS Release] • Syn Cole - Feel Good | Future House |...
*Please like, comment, and subscribe for more*
#PulsarTECH #AdobePremierePro2020 #AdobePremiereProTutorial