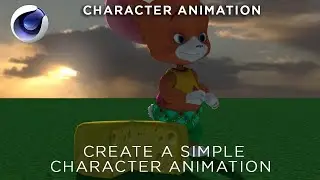
How to do Character Rigging in Cinema 4D
Welcome to another quick tutorial.
This tutorial will show you how to use the character rigger to rig your character so that it is ready to be animated.
First, we are going to create a very simple, basic character in the traditional pose with arms spread out, standing straight up. We are only going to use cubes for now to create this character.
I've created this block character, and have made the cubes editable so that I could connect all objects and delete.
Now, we can use the character rigger to start building, adjusting, binding, and animating our character.
First, we build out the rig, starting with root. For this, we are only going to add a Spine, arms, and legs. The spine gives us our head. If you have one arm simply click arm again and you'll get the other arm connected to the spine.
Now, we want to make sure that snapping is turned on. We are going to adjust our character into place. Make sure that when adjusting, you always start close to the spine. Otherwise, you'll have issues getting it just right.
Next, we are going to bind this character to our model. This will create skin, make the cubes in our model flexible.
When done with that, we are going to click animate, and add walk.
We now have a looping walk cycle for our animated, rigged character.
This was a very basic example of how to rig a character in Cinema 4D. Stay tuned for more tutorials like this, and please subscribe.
My Website - https://www.vrvisage.com/
For this and more tutorials, or to contract me and my services for your next project, please contact me at: https://www.vrvisage.com/contact/
VR Visage is a 3D animation, augmented, and virtual reality development company with years of experience developing many different types of projects for many customers. Our creative team are dedicated to making the process easy for you to understand, which is why we share so much of our knowledge to the world via youtube. We look forward to speaking with you!


![[VOSTFR] BANGTAN BOMB A Boisterous Shooting of 3J BTS](https://images.mixrolikus.cc/video/2LYgH-gGutM)