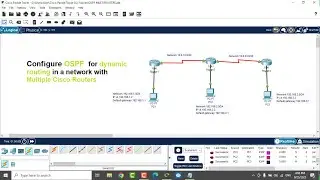
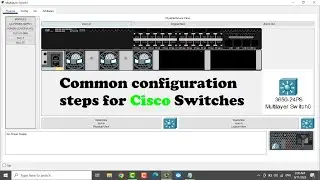
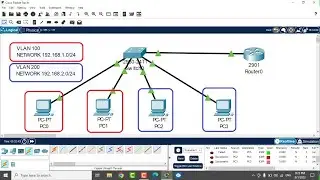
How to Configure VLANs & Trunk on Cisco Switch - Step-by-Step Guide for Beginners
How to configure VLANs &Trunk in Cisco Switch - Basic Sample Guide -Step by Step - for Beginners
Full Guide :
1.Connect to your Cisco switch using a terminal emulator application (e.g., PuTTY or SecureCRT).
2.Enter privileged EXEC mode by typing:
enable
3.Enter global configuration mode:
configure terminal
4.Create VLANs (Replace VLAN_ID with the desired VLAN numbers and VLAN_NAME with their respective names):
vlan VLAN_ID
name VLAN_NAME
For example:
vlan 10
name Sales
vlan 20
name Marketing
vlan 30
name IT
5.Configure trunk and access ports as needed. For trunk ports (Replace INTERFACE with the actual interface name, e.g., GigabitEthernet0/1):
interface INTERFACE
switchport mode trunk
switchport trunk allowed vlan VLAN_LIST
For example:
interface GigabitEthernet0/1
switchport mode trunk
switchport trunk allowed vlan 10,20,30
6.For access ports (Replace INTERFACE with the actual interface name and VLAN_ID with the desired VLAN number):
interface INTERFACE
switchport mode access
switchport access vlan VLAN_ID
For example:
interface FastEthernet0/2
switchport mode access
switchport access vlan 10
7.Exit the interface configuration mode:
exit
8.Save the configuration:
write memory
or
copy running-config startup-config
Please remember to adjust the configuration to your specific switch model and interface names. It’s essential to be cautious while making changes to your network configuration to avoid any potential issues.
Best Regards ,
AHMED AZBA from I.T PLUS SOLUTIONS .


![[FREE] Lil Baby Type Beat -](https://images.mixrolikus.cc/video/le1vVTKi0oM)