[PS3] E3 NOR FLASHER - How to push the console - hardware downgrade
Needed:
I. PS3 game console, compatible with E3 Flasher, namely:
all the facts starting with CHECH H (CHECH A - CHECH G are not rolling due to NAND memory)
the date with Code Code is no higher than 1V. Date Code can be seen on the back of the prefix. For example, 2508 1A and early models are flashing
E3 Flasher
Micro SD Card and card reader
USB flash drive formatted in FAT32
For the beginning, we flasher the flasher on the following instructor:
Method 1: Via micro-card.
Download the firmware (http://yadi.sk/d/yduTfyg8KtTBu) and throw the update.bin file onto the micro-card (formatted in FAT 32)
We set the switches on the flasher 1 and 2 down, the rest up
Insert the card in the e3 flash drive socket and turn on the console
all 8 LEDs must light up, meaning the flashlight is flashing
You can still check by connecting micro-card to the computer - the update.bin file should not be.
Method 2: Through a micro-cable.
We set the switches as well as in the first method
connect the cable to the computer and turn on the prefix
KernelBoot DISK should appear, unless a reset has appeared
we send the update.bin file to it
At the end of the firmware flash drive should light up 8 blue LEDs
II We lower the firmware according to the following instructions
If the official firmware is below 4.82 - we download the official firmware 4.82 (https://www.playstation.com/en-us/get...) and install it via xmb twice.
If the official firmware is 4.82 - set one time.
The firmware should be at the root of the flash flute 32 in the following structure: PS3, in it UPDATE folder, in it the firmware PS3UPDAT.PUP
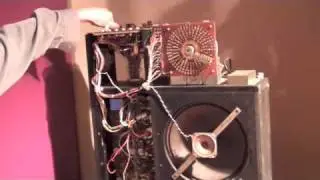
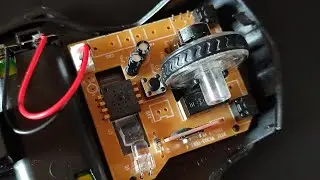
Connect the flasher as shown in the video, switch 3 up (backup), the rest down, remove the dump 3 times, check the normal inspector (http://yadi.sk/d/PukVkLYw7m5m3) values ros0 and ros1 - must match. In the status column, all indications should be green. If there are errors, press the clip to the board and repeat the process.
We check the hash sum of 3 dumped dumps by the hashtab program (http://yadi.sk/d/j4Lb3_tL7m6Gy) - they must be the same.
If the nurinspektor shows errors or hash amounts do not coincide, continuing to drop is dangerous, since you get a brick
Download PS3DumpChecker (https://github.com/Swizzy/PS3DumpChec..., roll over the dump on PS3DumpChecker.exe, if the error occurs, then first open PS3DumpChecker.exe, and then drag and drop it onto it. dump
The loadconfiguration column should have all the green color, and in the lower case it is written in uppercase letters OK - that means everything is fine with the dump, if there are mistakes, do not proceed further, since you will get a brick
The program immediately offers a patch - agree, pressing yes. The patch window appears
After patching in the folder with the program there will be a patched dump - bkpps3_patched.bin, perimeinizing it in bkpps3.bin.
Put the patched dump on the micro-card card and insert it into the flasher, switches everything down, press start and wait for blinking LED e3 flesher (process takes 8-10 minutes)
Turn off the console, after that we turn off the clip and remove it from the flash drive, instead we connect the hard disk to its nest and also install the blu-ray drive - for all data with the standard chip, as well as for models 200x and 210x, for models 250x installed the drive does not play the role.
Turn on the console and install a custom firmware through xmb not lower than 4.82, for example 4.82 FERROX (http://www.psx-place.com/threads/4-82... /)
Install via Install Package Files multiman 04.82 (http://psx-core.ru/forum/19-1467-1) or WebMAN or any other manager
Collect the console.
![[Raw, Boring] Four Random Landings](https://images.mixrolikus.cc/video/wacFCUJeWzc)