IoT Based Smart Lock V2.0
📕 IoT Based Smart Lock V2.0 🔑🔐
⏰ Timestamps
00:00 Start
00:31 Overview of the Project
01:38 Functional Block Diagram
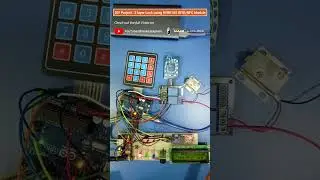
04:18 Hardware Setup - Main Circuit Diagram & Interfacings
05:11 ESP32 to Nextion Display Interfacing
09:35 ESP32 to MFRC522 RFID Reader Interfacing
11:30 ESP32 to FPM10A Fingerprint Sensor Interfacing
13:43 Software Setup - Part I : IDE and Libraries
14:51 Source Code Details
16:59 How to send 'Locker Entries' data to web portal ?
19:05 Software Setup - Part II : Hosting PHP Application and MySQL DB
20:00 Webportal Method I - Dedicated Domain and Web Hosting
27:57 Webportal Method II - XAMPP application, local webserver
32:33 How to Generate OTP ?
35:00 Final Demo of the Project
📜 Parts Required
1. NodeMCU ESP32S Development Board
2. RC522 RFID Reader Module
3. FPM10A Fingerprint Sensor
4. 3.5" Nextion Touchscreen HMI Display
5. MB102 Breadboard Power Supply module
6. 12V Solenoid Lock
7. 2 Channel Relay Board 5V
8. Batteries - 7.4V LiPo, 11.1V LiPo and Power Bank.
📷 About Video -
🚩 In this project we've build IoT based smart lock which have 4 layers of access. RFID + PIN + Fingerprint + OTP.
🚩 We have slightly upgraded our previous version of the project. In this version we are going to add one more accessibility layer. That is biometric, means, we will add fingerprint based authentication.
🚩 Also we are going to use different MCU development Board. In version 1 we have used Particle Photon Board, but in this project we will use ESP32 development board.
🚩 So now, if user want to unlock this lock, then he or she should have Valid RFID, Fingerprint, PIN and OTP, means one time password.
🚩 Also we have programmed this lock system to keep record data of user entries with user name and timestamp. This data will recorded on our dedicated mySQL database which is hosted on our webserver, hence the system Administrator can login to that web portal and, keep track of how many time this lock got opened.
🚩 Nextion Touchscreen HMI Display is used for interacting with this door lock.
#make2explore #IoT #ESP32 #ScienceProjects #Arduino #ESP8266 #RaspberryPi
||=========================================================================||
🌐 Source Code, Schematics and Libraries -
Visit ▶️ https://github.com/make2explore/IoTba...
📌 How to add ESP32 core into an Arduino IDE ? - ⏩ • How to Install ESP8266 & ESP32 Dev Bo...
📌 How to Get started with Nextion Display ? - ⏩ • [Part - 3] IoT Based Smart Door Lock...
📌 How to Install Telegram App ? - ⏩ • Monitoring and Controlling ESP Weathe...
📌 How to Create Telegram Bot ? - ⏩ • Monitoring and Controlling ESP Weathe...
📌 How to Get your Telegram Chat ID ? - ⏩ • Monitoring and Controlling ESP Weathe...
📌 How to Install and Configure XAMPP ? - ⏩ • How to Install XAMPP Server on Window...
☎️ for source code and queries contact us on - 📩 [email protected]
🚀 Telegram - @make2explore
||=========================================================================||
www.make2explore.com
📕 Who we are
make2explore Embedded Systems is a Tech Startup, working in the fields of Electronics, Embedded Systems, Robotics and STEM Education. We develop DIY Robotics Kits, Embedded Electronics Hobby Kits and STEM Educational Kits for Students and Hobbyists.
Check out our blog: ► https://blog.make2explore.com
Like us on Facebook: ► / make2explore
Follow us on twitter: ► / make2explore
Follow us on Instagram: ► / make2explore
Follow us on Pinterest: ► / make2explore
||=========================================================================||
🗣 Neural Voice Credits - IBM Watson TTS
🎵 Music Credits -
Track: Elektronomia - Sky High pt. II [NCS Release]
Royalty Free Music provided by NoCopyrightSounds.
Watch: • Elektronomia - Sky High pt. II | Hous...
Free Download / Stream: http://ncs.io/SkyHigh2
-
-
-
![[4K] 🇺🇸 Bike Ride Around Miami Beach! 🚴♂️🌴](https://images.mixrolikus.cc/video/jmqP9oyWT7s)


![[HND] ESP32 Matter-Light Application Demo #iot #esp32 #matter](https://images.mixrolikus.cc/video/9W7X0XbHqpM)
![[ENG] ESP32 Matter-Light Application Demo #iot #esp32 #matter](https://images.mixrolikus.cc/video/nQc11ULfip0)
![[Tutorial] Installation and Use of ESP-IDF Extension in Visual Studio Code](https://images.mixrolikus.cc/video/EBXK3Mr6y7I)
![[DIY Project] ESP32 IoT Home Automation Project using IR Remote, RF Remote and ESP Rainmaker App](https://images.mixrolikus.cc/video/A4qnnGCsRNw)
![[DIY Project] ESP32 IoT Home Automation Project using RF Remote and ESP Rainmaker](https://images.mixrolikus.cc/video/0JpGXPFtY6Y)
![[DIY Project] ESP32 IoT Home Automation Project using IR Remote and ESP Rainmaker](https://images.mixrolikus.cc/video/T786g_ZvO_Y)
![[Tutorial] Getting Started with Matter on ESP32](https://images.mixrolikus.cc/video/c6K8ZA3cKEQ)
![[Tutorial] Getting Started With ESP Rainmaker](https://images.mixrolikus.cc/video/AQDzyJrRA5M)
![[Device Overview] Ultra-wideband Transceiver Module RYUW122](https://images.mixrolikus.cc/video/HwBakNIPAz4)
![[Device Overview] Adafruit Circuit Playground Express](https://images.mixrolikus.cc/video/tHRV9FFY870)
![[Tutorial] Raspberry Pi Pico OLED Animations](https://images.mixrolikus.cc/video/YMGYbmGxhP4)
![[DIY Project] Thermostat System monitoring from Arduino IoT Cloud](https://images.mixrolikus.cc/video/JM7dwcP62Ns)
![[Device Overview] Seeed Studio's Wio-E5 LoRa Development Boards](https://images.mixrolikus.cc/video/4ojRbUSfYdo)
![[DIY Project] Wio-E5 LoRa Dev Boards](https://images.mixrolikus.cc/video/xma1WmYEH8g)
![[DIY Project] Application of Wio-E5 Dev Boards in LoRa WSN](https://images.mixrolikus.cc/video/B6kpMtoYYbQ)